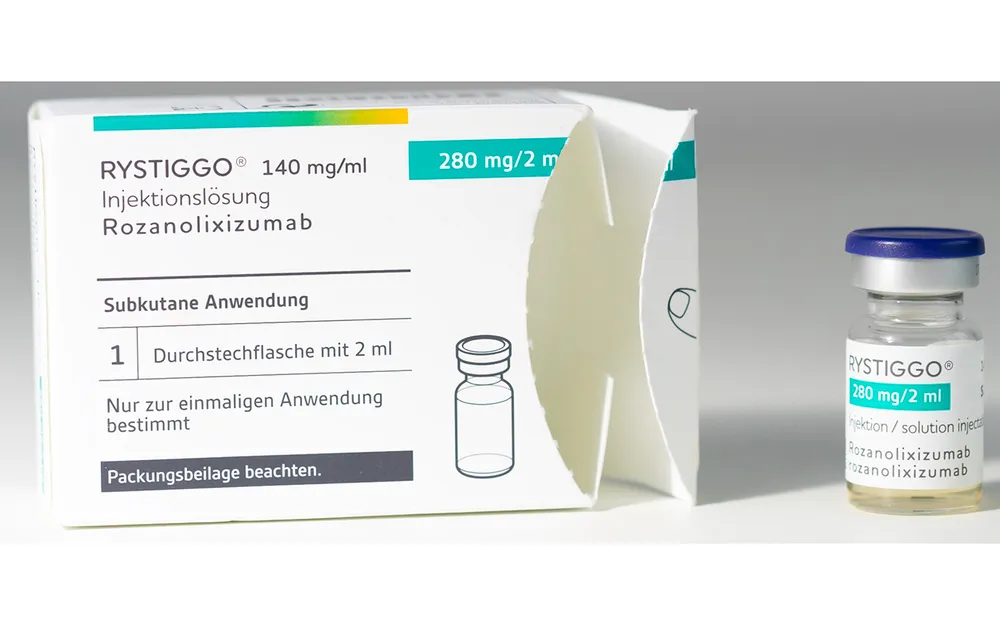
RYSTIGGO 140 MG/ML SOLUTION FOR INJECTION
SpainIt is used in adults to treat generalized myasthenia gravis (gMG), an autoimmune disease that causes muscle weakness, extreme fatigue, and difficulty breathing or swallowing.
Frequently asked questions
How should I take Rystiggo?
It is administered via subcutaneous infusion, generally in the lower abdomen. Treatment is carried out in cycles of one infusion per week for 6 weeks, with a dose calculated by your doctor based on your weight.
When should I not use this medication?
You must not use it if you are allergic to the active substance or any of its components. You should also not use it if you have hyperprolinemia, unless specifically instructed by your doctor.
What side effects can Rystiggo have?
The most frequent side effects include headache (including migraine), diarrhea, and fever. Nausea, vomiting, joint pain, skin rashes, or injection site reactions may also occur.
What should I keep in mind regarding vaccines?
You must inform your doctor if you have received a vaccine in the last 4 weeks or if you plan to be vaccinated soon. Vaccination with live or attenuated microorganism vaccines is not recommended during treatment.
Are there interactions with other medications?
The use of Rystiggo may decrease the efficacy of other medications, such as certain therapeutic antibodies or immunoglobulins. Other treatments, such as plasmapheresis, may also affect its effect.
What should I do if I miss a dose?
If you miss a dose, contact your doctor immediately to schedule a new appointment within the following 4 days and continue with your original schedule.
How should I store the medication?
It must be stored in the refrigerator (between 2 °C and 8 °C) in its original box to protect it from light. Do not freeze. It can be kept at room temperature up to 25 °C for a single period of a maximum of 20 days.
Instructions for use
Package leaflet: Information for the user
Introduction
Package leaflet: information for the patient
Rystiggo 140 mg/ml solution for injection
rozanolixizumab
This medicinal product is subject to additional monitoring, which will allow rapid identification of new safety information. You can help by reporting any side effects you may experience. Section 4 at the end includes information on how to report these side effects.
Read this entire leaflet carefully before you start using this medicine, because it contains important information for you.
- Keep this leaflet, as you may need to read it again.
- If you have any questions, ask your doctor, pharmacist, or nurse.
- This medicine has been prescribed for you only, and you must not give it to other people, even if they have the same symptoms as you, since it could harm them.
- If you experience any side effects, consult your doctor, pharmacist, or nurse, even if they are possible side effects not listed in this leaflet. See section 4.
Leaflet contents
- What Rystiggo is and what it is used for
- What you need to know before using Rystiggo
- How to use Rystiggo
- Possible side effects
- How to store Rystiggo
- Contents of the pack and other information
1. What Rystiggo is and what it is used for
What Rystiggo is
Rystiggo contains the active substance rozanolixizumab. Rozanolixizumab is a monoclonal antibody (a type of protein) designed to recognize and bind to FcRn, a protein that prolongs the presence of immunoglobulin G (IgG) antibodies in the body.
Rystiggo is used in combination with standard treatment in adults to treat generalized myasthenia gravis (gMG), an autoimmune disease causing muscle weakness that affects multiple muscle groups in the body. The condition may also cause difficulty breathing, extreme fatigue, and problems with swallowing. Rystiggo is used in adults with gMG who have IgG autoantibodies against either acetylcholine receptors or muscle-specific kinase.
In generalized myasthenia gravis (gMG), these IgG autoantibodies (immune system proteins that attack parts of a person's own body) attack and damage proteins involved in nerve-to-muscle communication, known as acetylcholine receptors or muscle-specific kinase.
By binding to FcRn, Rystiggo reduces the levels of IgG antibodies, including IgG autoantibodies (antibodies directed against the body's own tissues), thereby helping to improve disease symptoms.
2. What you need to know before starting to use Rystiggo
Do not use Rystiggo
- If you are allergic to rozanolixizumab or to any of the other ingredients of this medicine (listed in section 6).
Warnings and precautions
Talk to your doctor, pharmacist, or nurse before starting to use this medicine if you are in any of the following situations:
Myasthenic crisis
Your doctor may not prescribe this medicine if you are using a ventilator, or are likely to require one, due to muscle weakness caused by gMG (myasthenic crisis).
Inflammation of the membranes surrounding the brain and spinal cord (aseptic meningitis)
Aseptic meningitis has been observed in association with this medicine. Seek immediate medical attention if you develop symptoms of aseptic meningitis, such as severe headache, fever, neck stiffness, nausea, vomiting, and/or sensitivity to bright light.
Infections
This medicine may reduce your body's natural resistance to infections. Before starting treatment with this medicine or during treatment, inform your doctor if you have any symptoms of infection (feeling unwell, fever, chills or shivering, cough, sore throat, or cold sores may be signs of an infection).
Hypersensitivity (allergic reactions)
This medicine contains a protein that may cause allergic reactions such as rash, swelling, or itching in some people. You will be monitored for signs of an infusion reaction during treatment and for 15 minutes after.
Vaccinations (vaccines)
Inform your doctor if you have received a vaccine in the past 4 weeks or if you plan to be vaccinated in the near future.
Children and adolescents
Do not administer this medicine to children under 18 years of age, as the use of Rystiggo has not been studied in this age group.
Other medicines and Rystiggo
Tell your doctor or pharmacist if you are taking, have recently taken, or might need to take any other medicines.
Using Rystiggo with other medicines may reduce the effectiveness of those medicines, including therapeutic antibodies (such as rituximab) or subcutaneous or intravenous immunoglobulins. Other medicines, including subcutaneous or intravenous immunoglobulins, or procedures such as plasmapheresis (a process in which the liquid part of the blood, or plasma, is separated from blood drawn from a person), may affect the effect of Rystiggo. Inform your doctor if you are taking or plan to take any other medicine.
Before vaccination, inform your doctor about your treatment with Rystiggo. This medicine may affect the response to vaccines. Vaccination with so-called live or attenuated vaccines is not recommended during treatment with Rystiggo.
Pregnancy and breastfeeding
If you are pregnant or breastfeeding, think you may be pregnant, or are planning to become pregnant, consult your doctor or pharmacist before using this medicine.
The effects of this medicine during pregnancy are unknown. You should not use this medicine if you are pregnant or think you might be pregnant unless specifically advised by your doctor.
It is not known whether this medicine passes into breast milk. Your doctor will help you decide whether to breastfeed while using Rystiggo.
Driving and using machines
It is unlikely that Rystiggo will affect your ability to drive or use machines.
Rystiggo contains proline
This medicine contains 29 mg of proline per millilitre of medicine.
Proline may be harmful for patients with hyperprolinemia, a rare genetic disorder in which excess of the amino acid proline accumulates in the body.
If you have hyperprolinemia, inform your doctor and do not use this medicine unless specifically recommended.
Rystiggo contains polysorbate 80
This medicine contains 0.3 mg of polysorbate 80 per millilitre of medicine. Polysorbates may cause allergic reactions. Inform your doctor if you have any known allergies.
3. How to use Rystiggo
Treatment with Rystiggo will be initiated and supervised by a specialist doctor experienced in the treatment of neuromuscular or neuroinflammatory disorders.
How much Rystiggo is administered and for how long
You will receive Rystiggo in cycles of 1 infusion per week for 6 weeks.
Your doctor will calculate the correct dose for you based on your body weight:
- if you weigh at least 100 kg, the recommended dose is 840 mg per infusion (requiring 6 ml per administration)
- if you weigh between 70 kg and less than 100 kg, the recommended dose is 560 mg per infusion (requiring 4 ml per administration)
- if you weigh between 50 kg and less than 70 kg, the recommended dose is 420 mg per infusion (requiring 3 ml per administration)
- if you weigh between 35 kg and less than 50 kg, the recommended dose is 280 mg per infusion (requiring 2 ml per administration)
The frequency of treatment cycles varies for each patient, and your doctor will determine whether it is appropriate for you to receive a new treatment cycle and, if so, when.
Your doctor will advise you on how long you should continue treatment with this medicine.
How Rystiggo is administered
Rystiggo will be administered by a doctor or nurse.
You may also self-inject Rystiggo. You and your doctor or nurse will decide whether, after receiving training from a healthcare professional, you can self-inject this medicine. Another person may also administer the injections after receiving training. Do not self-inject Rystiggo or allow anyone to inject it for you until you have been properly trained.
If you or your caregiver administer Rystiggo injections, you must carefully read and follow the Administration Instructions located at the end of this leaflet (see “Instructions for use”).
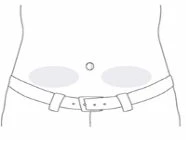
This medicine is given as a subcutaneous infusion (under the skin). It is usually injected into the lower abdomen, below the navel. Injections should not be given in areas where the skin is painful, bruised, red, or hardened.
Administration is performed using an infusion pump at a flow rate of up to 20 ml/h.
Alternatively, it may be administered manually (via manual slow injection, i.e., without an infusion pump) at a speed that is comfortable for you.
If you receive more Rystiggo than you should
If you suspect that you have accidentally received a dose of Rystiggo higher than prescribed, consult your doctor for advice.
If you missed or skipped an appointment to receive Rystiggo
If you miss a dose, contact your doctor immediately for advice and to schedule another appointment to receive Rystiggo within the next 4 days. After that, the next dose should be administered according to the original administration schedule until the treatment cycle is complete.
If you stop treatment with Rystiggo
Do not stop using this medicine without first talking to your doctor. Interrupting or stopping treatment with Rystiggo may cause generalized myasthenia gravis symptoms to return.
If you have any further questions about how to use this medicine, ask your doctor, pharmacist, or nurse.
4. Possible adverse effects
Like all medicines, this medicine can cause adverse effects, although not everyone experiences them.
The following adverse effects, listed in order of decreasing frequency, have been observed with Rystiggo:
Very common: may affect more than 1 in 10 people
- Headache (including migraine)
- Diarrhea
- Fever (pyrexia)
Common: may affect up to 1 in 10 people
- Rapid swelling under the skin in areas such as the face, throat, arms, and legs (angioedema)
- Joint pain (arthralgia)
- Skin rash, sometimes with red bumps (papular rash)
- Reaction at the injection site, such as rash at the injection site, redness of the skin (erythema), swelling, discomfort, and pain at the infusion site
- Nasal and throat infections
- Nausea
- Vomiting
Frequency not known (cannot be estimated from available data):
-
Reversible non-infectious inflammation of the protective membranes surrounding the brain and spinal cord (aseptic meningitis):
- headache
- fever
- neck stiffness
- nausea
- vomiting
- and/or photophobia (intolerance to bright light)
-
Viral infections (including herpes zoster and oral herpes)
Reporting of adverse effects
If you experience any type of adverse effect, consult your doctor, pharmacist, or nurse, even if it is a possible adverse effect not listed in this leaflet. You may also report them directly through the national reporting system included in Appendix V. By reporting adverse effects, you can help provide more information on the safety of this medicine.
5. Storage of Rystiggo
Keep this medicine out of the sight and reach of children.
Do not use this medicine after the expiry date stated on the vial label and the outer packaging following the word "EXP". The expiry date refers to the last day of the month indicated.
Store in a refrigerator (between 2 °C and 8 °C).
Do not freeze.
Rystiggo may be removed from the refrigerator and stored at room temperature (up to 25 °C) in the original outer packaging for a single period of up to 20 days. Do not use the medicine after this time period has elapsed. The carton includes a space to record the date when the vial was removed from the refrigerator.
Keep the vial in the original packaging to protect it from light.
Each vial of injectable solution must be used only once (single use). Any unused product or materials should be disposed of in accordance with local regulations.
Do not use this medicine if the solution appears cloudy or discoloured, or if it contains foreign particles.
Medicines should not be disposed of via wastewater or household waste. Ask your pharmacist how to dispose of medicines no longer required. These measures will help protect the environment.
6. Contents of the pack and other information
Composition of Rystiggo
- The active substance is rozanolixizumab. Each ml of solution contains 140 mg of rozanolixizumab. Each 2 ml vial contains 280 mg of rozanolixizumab. Each 3 ml vial contains 420 mg of rozanolixizumab. Each 4 ml vial contains 560 mg of rozanolixizumab. Each 6 ml vial contains 840 mg of rozanolixizumab.
- The other components are: histidine, histidine hydrochloride monohydrate, proline, polysorbate 80, and water for injections. See section 2: Rystiggo contains proline and Rystiggo contains polysorbate 80.
Appearance of the product and contents of the pack
Rystiggo is an injectable solution. Each pack contains 1 vial of 2 ml, 3 ml, 4 ml, or 6 ml of injectable solution.
Only certain vials may be marketed.
The solution is colourless to pale brownish yellow and ranges from transparent to slightly opalescent (pearl white).
Materials used for administration must be obtained separately.
Marketing Authorisation Holder
UCB Pharma S.A., Allée de la Recherche 60, B-1070 Brussels, Belgium
Manufacturer
UCB Pharma S.A., Chemin du Foriest, B-1420 Braine-l’Alleud, Belgium.
For further information about this medicine, please contact the local representative of the Marketing Authorisation Holder:
Belgium/Belgium/Belgium UCB Pharma S.A./NV Tel/Tel: + 32 / (0)2 559 92 00 | Lithuania UAB Medfiles Tel: + 370 5 246 16 40 |
| Luxembourg/Luxembourg UCB Pharma S.A./NV Tél/Tel: + 32 / (0)2 559 92 00 (Belgium/Belgium) |
Czech Republic UCB s.r.o. Tel: + 420 221 773 411 | Hungary UCB Magyarország Kft. Tel.: + 36-(1) 391 0060 |
Denmark UCB Nordic A/S Tlf.: + 45 / 32 46 24 00 | Malta Pharmasud Ltd. Tel: + 356 / 21 37 64 36 |
Germany UCB Pharma GmbH Tel: + 49 /(0) 2173 48 4848 | Netherlands UCB Pharma B.V. Tel: + 31 / (0)76-573 11 40 |
Estonia OÜ Medfiles Tel: + 372 730 5415 | Norway UCB Nordic A/S Tlf: + 47 / 67 16 5880 |
Greece UCB Α.Ε. Tel: + 30 / 2109974000 | Austria UCB Pharma GmbH Tel: + 43-(0)1 291 80 00 |
Spain UCB Pharma, S.A. Tel: + 34 / 91 570 34 44 | Poland UCB Pharma Sp. z o.o. / VEDIM Sp. z o.o. Tel.: + 48 22 696 99 20 |
France UCB Pharma S.A. Tél: + 33 / (0)1 47 29 44 35 | Portugal UCB Pharma (Pharmaceutical Products), Lda Tel: + 351 21 302 5300 |
Croatia Medis Adria d.o.o. Tel: +385 (0) 1 230 34 46 | Romania UCB Pharma Romania S.R.L. Tel: + 40 21 300 29 04 |
Ireland UCB (Pharma) Ireland Ltd. Tel: + 353 / (0)1-46 37 395 | Slovenia Medis, d.o.o. Tel: + 386 1 589 69 00 |
Iceland Vistor hf. Tel: + 354 535 7000 | Slovak Republic UCB s.r.o., organisational unit Tel: + 421 (0) 2 5920 2020 |
Italy UCB Pharma S.p.A. Tel: + 39 / 02 300 791 | Finland UCB Pharma Oy Finland Puh/Tel: + 358 9 2514 4221 |
Cyprus Lifepharma (Z.A.M.) Ltd Tel: + 357 22 056300 | Sweden UCB Nordic A/S Tel: + 46 / (0) 40 294 900 |
Latvia Medfiles SIA Tel: + 371 67 370 250 |
Date of last review of this leaflet:
Other sources of information
Detailed information on this medicine is available on the website of the European Medicines Agency: https://www.ema.europa.eu. There are also links to other websites about rare diseases and orphan medicines.
INSTRUCTIONS FOR USE
Rystiggo (rozanolixizumab)Rystiggo 140 mg/ml solution for subcutaneous injection
Single-use vial
Read all of these instructions before starting to use Rystiggo. A doctor or nurse will show you how to administer Rystiggo before you use it for the first time. Another person may also administer the injections after receiving the necessary training. Do not administer Rystiggo to yourself or to another person until you have been properly trained to do so. This information does not replace consultation with your doctor regarding your condition or treatment.
If you are going to use an infusion pump (also called a syringe pump) to administer Rystiggo, read the pump setup instructions provided by your doctor or nurse.
! Important information you must know before administering Rystiggo or giving it to someone else
|
|
Rystiggo storage
|
|
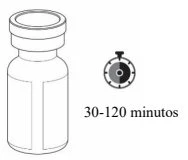
! Keep this medicine out of sight and reach of children.
Contents of the pack
- 1 vial of Rystiggo (2 ml, 3 ml, 4 ml, or 6 ml depending on the dose prescribed to you).
- Rystiggo patient leaflet with Instructions for Use.
Step-by-step instructions
- Prepare
Step 1: Gather all the materials you will need on a clean, flat work surface:
- Included in the Rystiggo pack(s):
- Rystiggo vial.
- Rystiggo patient leaflet.
! Check your dose (you may need more than 1 vial to prepare the prescribed dose).
|
|
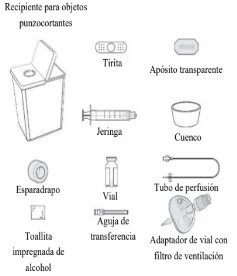
! The above materials are for illustrative purposes only. Your specific materials may look different.
Step 2: Clean your work surface and wash your hands
- Clean your work surface with a disinfectant and thoroughly wash your hands with water and soap, or use a hand sanitizer. Dry them with a clean towel.
- Prepare the vial(s) and syringe
! Check your dose (you may need more than 1 vial to prepare the prescribed dose).
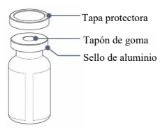
Step 3: Remove the protective cap(s) from the vial(s)
|
|
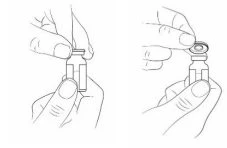
! If you are using a vial adapter with a vent filter instead of a transfer needle, you can go directly to step 7.
Step 4: Attach the transfer needle to the syringe
Step 5: Draw air into the syringe
|
|
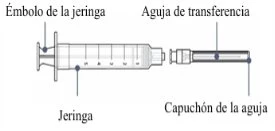
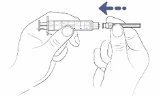
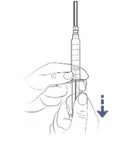
Step 6: Remove the transfer needle cap
|
|
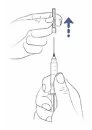
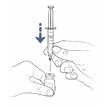
Step 7: Insert the transfer needle or the vial adapter with vent filter directly into the vial Follow the instructions corresponding to the transfer method you are going to use: With transfer needle
With vial adapter
|
|
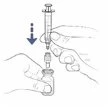
Step 8: Turn the vial and syringe
! If you are using a vial adapter with vent filter, proceed directly to Step 11. |
|
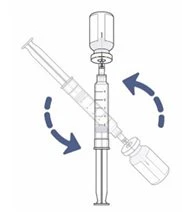
Step 9: Push the air from the syringe into the vial
|
|
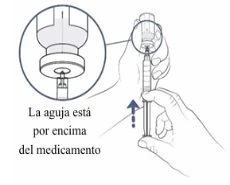
Step 10: Prepare to fill the syringe
|
|
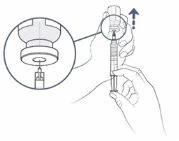
Step 11: Fill the syringe with as much medication as possible ! Check your dose (you may need more than one vial to prepare the prescribed dose).
If you are using a transfer needle to fill the syringe, do the following:
! A very small amount of medication will remain in the vial and cannot be withdrawn. This should be discarded together with the vial later. ! If you are using a vented vial adapter with filter, disconnect the syringe from the adapter. Leave the vented vial adapter with filter in the vial. It may be discarded at the end of the infusion. You may now proceed directly to Step 14. |
|
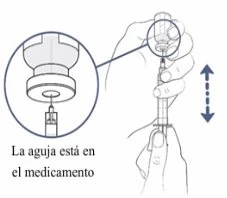
Step 12: Remove air from the syringe
|
|
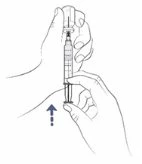
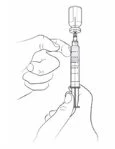
Step 13: Remove the transfer needle from the vial and syringe
|
|
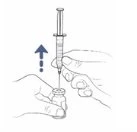
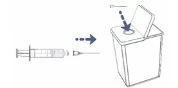
Step 14: Check your dose again
|
- Prepare for infusion
Step 15: Connect the infusion tube to the syringe
|
|
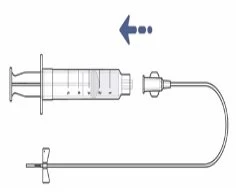
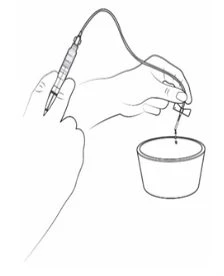
Step 16: Fill the infusion tube with the medication
|
|
Step 17: Choose and prepare the infusion site
|
|
Step 18: Insert the infusion set needle
|
|
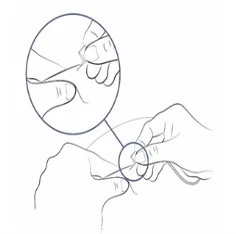
Step 19: Secure the infusion set needle
|
|
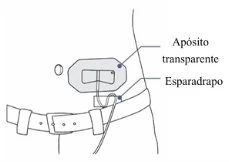
- Infuse and complete
Step 20: Start the infusion
Follow the instructions corresponding to the infusion method you will be using:
Manual injection
- Sit comfortably and firmly push the syringe plunger to infuse the medicine.
- Infuse the medicine at a rate that is comfortable for you. Continue pushing until no medicine remains in the syringe.
- Before and during the infusion, ensure that the infusion tube does not bend or twist. If this occurs, the flow of medicine may be interrupted. In such a case, correct the bend in the infusion tube and try again.
- If you feel discomfort or if some of the medicine flows back into the infusion tube, you may push more slowly.
Syringe pump
-
Before using a syringe pump, make sure you understand the following:
- How to set up the syringe pump (set an infusion rate of up to 20 ml per hour).
- How to set the occlusion alarm to the maximum.
- How to start the syringe pump.
- What the various sounds and alarms of the syringe pump mean and what to do in each case.
- How to stop the syringe pump.
-
When you are ready for the infusion:
- Place the syringe in its holder and start the pump according to its instructions.
- Sit comfortably while the pump administers the medicine.
- Before and during the infusion, ensure that the infusion tube does not bend or twist. If this occurs, the flow of medicine may be interrupted. In such a case, correct the bend in the infusion tube and try again.
- Once the infusion is complete, stop the pump according to its instructions.
- Remove the syringe from the pump.
! Note: A small amount of medicine will remain in the infusion tube. This is normal and can be discarded into the sharps container.
Step 21: Finish the infusion and proceed with cleaning
|
|
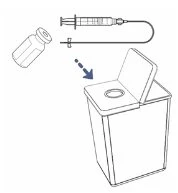
! Always keep the sharps container out of sight and reach of children.
The original data is available in the language of the country of manufacture.
Data source: Online Medicines Information Centre (CIMA) — AEMPS
Data last verified: September 21, 2026